ASIF
aspnet core middleware

Custom Middlewares in asp.net Core

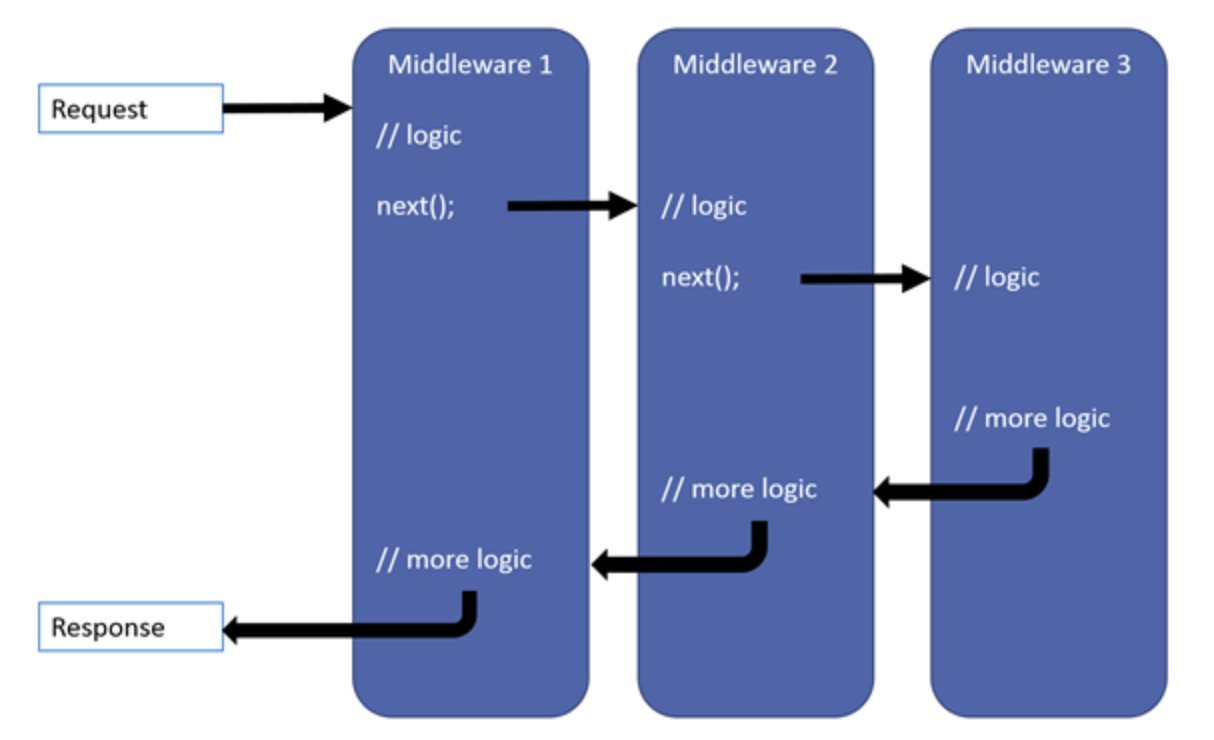
Middleware in ASP.NET Core is software that's assembled into an application pipeline to handle requests and responses. Custom middleware allows developers to insert their own logic into this pipeline to perform specific tasks, such as logging, error handling, authentication, etc.

To create a custom error handling middleware in ASP.NET Core, we'll write a middleware that catches exceptions thrown during request processing and generates a custom error response.

Here's a step-by-step guide to creating a custom error-handling middleware:

1. Create a Custom Error Handling Middleware

using Microsoft.AspNetCore.Builder;
using Microsoft.AspNetCore.Http;
using System;
using System.Threading.Tasks;

public class ErrorHandlingMiddleware
{
private readonly RequestDelegate _next;

public ErrorHandlingMiddleware(RequestDelegate next)
{
_next = next;
}

public async Task InvokeAsync(HttpContext context)
{
try
{
// Call the next middleware in the pipeline
await _next(context);
}
catch (Exception ex)
{
// Handle the exception and generate a custom error response
await HandleExceptionAsync(context, ex);
}
}

private Task HandleExceptionAsync(HttpContext context, Exception exception)
{
// Log the exception (you can use a logging framework like Serilog, NLog, etc.)

// Customize the error response
context.Response.ContentType = "application/json";
context.Response.StatusCode = StatusCodes.Status500InternalServerError;
return context.Response.WriteAsync("An unexpected error occurred. Please try again later.");
}
}

public static class ErrorHandlingMiddlewareExtensions
{
public static IApplicationBuilder UseErrorHandlingMiddleware(this IApplicationBuilder builder)
{
return builder.UseMiddleware<ErrorHandlingMiddleware>();
}
}

2. Register the Middleware in the Startup.cs

In the Configure method of your Startup.cs, add the following line to register the custom error handling middleware:

public void Configure(IApplicationBuilder app, IWebHostEnvironment env) {

// ... other middleware registrations app.UseErrorHandlingMiddleware(); // ... other middleware registrations

}

3. Usage

Now, any unhandled exceptions that occur during request processing will be caught by the custom error handling middleware, and an appropriate error response will be generated.

public class HomeController : Controller
{
public IActionResult Index()
{
// Simulate an exception
throw new Exception("This is a sample exception.");
}
}

In this example, when an exception is thrown in the Index action of the HomeController, the custom error handling middleware will catch it and return a customized error response to the client.

Make sure to replace the error response in the HandleExceptionAsync method with a meaningful and appropriate error message or response format based on your application's requirements.

Synchronous Programming in .NET 8: When It Makes Sense!

While asynchronous programming has become the go-to for modern .NET apps, there are still scenarios where synchronous programming can shine. With .NET 8, performance improvements and optimizations make it more efficient than ever.

Where Synchronous Programming Works Best
If your application is CPU-bound or you need to maintain strict execution order without the overhead of async operations, synchronous methods can offer a clean, simpler solution.

Here’s a quick example in .NET 8:

// Synchronous method to process data
public void ProcessDataSynchronously()
{
for (int i = 0; i < 100; i++)
{
Console.WriteLine($"Processing item {i}");
// Simulate heavy CPU-bound work
Thread.Sleep(10); // or a compute-heavy task
}
}

Notice how the synchronous method provides straightforward, predictable execution, perfect for CPU-bound tasks like algorithm processing.

When to Use Sync:

  1. CPU-bound tasks where async won’t add value.
  2. Small-scale, predictable operations.
  3. Simplified code for scenarios like database access or logging.

In contrast, here’s an async version:

// Asynchronous method to process data
public async Task ProcessDataAsynchronously()
{
for (int i = 0; i < 100; i++)
{
Console.WriteLine($"Processing item {i}");
// Simulate non-blocking async work
await Task.Delay(10);
}
}


Async works best for I/O-bound tasks like network requests or file reads, but for CPU-bound tasks, synchronous code can reduce overhead and improve clarity.

⚙️ Key .NET 8 Enhancements:

  • ThreadPool Improvements to reduce lock contention.
  • Performance Boosts for synchronous operations in heavy CPU-bound scenarios.

Best Practice:
Balance between sync and async by understanding the nature of your application—CPU-bound tasks? Go synchronous for simplicity and performance!


Unlocking the Power of Generics in C# – Elevate Your Code with Flexibility and Reusability!

Today, let’s dive into the dynamic world of generics in C#.

What are Generics?

They’re blueprints for creating flexible classes, methods, and interfaces that can work with various data types, determined at runtime.

Think of them as placeholders (like T) that get filled in later, providing exceptional adaptability.

Benefits of Generics:

⚡️Enhanced code reusability: Write code once and use it with different types, reducing redundancy and streamlining development. ♻️
⚡️Stronger type safety: Compile-time checks prevent type-related errors, boosting code reliability and maintainability.
⚡️Improved performance: Just-in-time (JIT) compiler can often optimize generic code for specific types, leading to potential performance gains. ⚡️
⚡️Cleaner and more expressive code: Generics make intentions clear and reduce casting, promoting readability and clarity. ✨

Generics in C# offer a powerful way to write flexible and reusable code. Let’s explore some key benefits with illustrative examples:

⚡️Code Reusability:
Generics enable you to write functions and classes that can operate on different data types without sacrificing type safety. This leads to more reusable and versatile code.

public class Stack<T>
{
private List<T> items = new List<T>();

public void Push(T item) => items.Add(item);

public T Pop()
{
if (items.Count == 0)
throw new InvalidOperationException(“Stack is empty”);

T result = items[^1];
items.RemoveAt(items.Count – 1);
return result;
}
}


⚡️Type Safety:
With generics, you maintain strong typing, catching potential errors at compile-time rather than runtime. This enhances the robustness of your code.

public T FindMax<T>(T[] array) where T : IComparable<T>
{
if (array.Length == 0)
throw new InvalidOperationException(“Array is empty”);

T max = array[0];
foreach (T item in array)
{
if (item.CompareTo(max) > 0)
max = item;
}
return max;
}

⚡️Performance Optimization:
Generics can improve performance by avoiding boxing and unboxing operations, as the code is specialized for each data type.

public class Calculator<T>
{
public T Add(T a, T b) => (dynamic)a + (dynamic)b;
}


⚡️Collection Classes:
Generics are extensively used in collection classes, allowing you to create collections that work with any data type.

List<int> intList = new List<int> { 1, 2, 3 };
List<string> stringList = new List<string> { “apple”, “orange”, “banana” };

Applications of Generics:

✨.NET Framework collections (List, Dictionary, etc.)
✨Custom collection classes
✨Generic methods and algorithms
✨LINQ queries
✨ And more!

What’s your favorite use of generics in C#? Share your thoughts in the comments! Let’s learn and grow together. ✨

hashtagCsharp hashtagGenerics hashtagTypeSafety hashtagReusability hashtagPerformance hashtagCleanCode hashtagCodeExample hashtagDeveloperLife hashtagLinkedInLearning

Javascript Data Types

JavaScript has several built-in data types that are used to represent different kinds of values. These data types can be categorized into two main categories: primitive data types and reference data types.

  1. Primitive Data Types: Primitive data types are the most basic data types in JavaScript. They are immutable (cannot be changed) and are stored directly in memory. The following are the primitive data types in JavaScript:

    a. Number: Represents both integer and floating-point numbers. Example: let num = 42;

    b. String: Represents a sequence of characters. Example: let str = "Hello, World";

    c. Boolean: Represents a true or false value. Example: let isTrue = true;

    d. Undefined: Represents a variable that has been declared but not assigned a value. Example: let undefinedVar;

    e. Null: Represents an intentional absence of any object value. Example: let nullVar = null;

    f. Symbol (ES6): Represents a unique and immutable value, often used as object property keys. Example: const sym = Symbol("unique");

    g. BigInt (ES11): Represents large integers that cannot be represented by the Number data type. Example: const bigIntValue = 1234567890123456789012345678901234567890n;

  2. Reference Data Types: Reference data types are more complex and store references to objects rather than the actual values. They are mutable, meaning their content can be changed. The following are common reference data types in JavaScript:

    a. Object: Represents a collection of key-value pairs, where keys are strings (or Symbols) and values can be of any data type. Example: const person = { name: "John", age: 30 };

    b. Array: A specialized type of object that stores ordered collections of values, typically indexed by numbers. Example: const numbers = [1, 2, 3, 4];

    c. Function: A callable object that can be defined using function expressions or function declarations. Functions are used to perform actions and return values. Example: function add(a, b) { return a + b; }

    d. Date: Represents dates and times. It provides methods for working with dates and times. Example: const currentDate = new Date();

    e. RegExp: Represents regular expressions for pattern matching. Example: const pattern = /abc/g;

    f. Other objects (e.g., Map, Set, WeakMap, WeakSet): JavaScript has additional built-in objects that are used for specific purposes, like data structures (Map, Set) or handling weak references (WeakMap, WeakSet).

Understanding these data types and how they behave is essential for effective JavaScript programming. You can use operators and methods that are specific to each data type for various operations in your code.

Var Vs Let

In JavaScript, let and var are used to declare variables, but they have some important differences in terms of scope and hoisting.

➡ var:

Variables declared with var are function-scoped. This means that they are only accessible within the function in which they are defined, and they are hoisted to the top of their containing function or script.

Hoisting means that the variable declaration is moved to the top of the function or script during the compilation phase, but the assignment remains in its original place. This can lead to unexpected behavior.

var variables can also be declared and accessed before they are actually defined in the code.

Example:

function example() {

 console.log(x); // undefined (hoisted)

 var x = 5;

 console.log(x); // 5

}

example();

console.log(x); // ReferenceError: x is not defined

let:

Variables declared with let are block-scoped. This means they are only accessible within the block (a block is defined by curly braces) in which they are defined, and they are not hoisted to the top of the function or script.

Variables declared with let are not accessible before the point at which they are declared in the code.

Example:

function example() {

 console.log(x); // ReferenceError: x is not defined

 let x = 5;

 console.log(x); // 5

}

example();

console.log(x); // ReferenceError: x is not defined

In modern JavaScript, it’s generally recommended to use let (or const for variables that should not be reassigned) over var.

CTE

Common Table Expressions

A Common Table Expression (CTE) is a temporary result set that can be referenced within a SELECT, INSERT, UPDATE, or DELETE statement in SQL Server. CTEs are useful for simplifying complex queries and improving code readability by breaking down a query into smaller, more manageable parts. CTEs are defined using the WITH statement and can be recursive or non-recursive.

Here’s the basic syntax for defining a non-recursive CTE:

WITH CTE_Name (Column1, Column2, ...) AS (
-- Subquery or SQL statement that defines the CTE
)
-- Query that references the CTE

And here’s the syntax for defining a recursive CTE:

WITH CTE_Name (Column1, Column2, ...) AS (
-- Anchor member: Initial query
SELECT ...
UNION ALL
-- Recursive member: Subquery that references the CTE itself
SELECT ...
)
-- Query that references the CTE

Here are some key points about CTEs in SQL Server:

▶Non-Recursive CTE: Non-recursive CTEs are used for simple queries that don’t involve recursion. They are often employed to simplify the query and improve readability. For example:

WITH EmployeesWithSalaryOver50k AS (
SELECT FirstName, LastName, Salary
FROM Employee
WHERE Salary > 50000
)
SELECT * FROM EmployeesWithSalaryOver50k;

WITH EmployeesWithSalaryOver50k AS (
SELECT FirstName, LastName, Salary
FROM Employee
WHERE Salary > 50000
)
SELECT * FROM EmployeesWithSalaryOver50k;

▶Recursive CTE: Recursive CTEs are used for queries involving hierarchical or recursive data structures, such as organizational hierarchies or bill of materials. They include both an anchor member (the initial query) and a recursive member (subquery that references the CTE itself) connected by a UNION ALL operation.

WITH EmployeeHierarchy (EmployeeID, ManagerID, EmployeeName, Depth) AS (
SELECT EmployeeID, ManagerID, EmployeeName, 0
FROM Employees
WHERE ManagerID IS NULL -- Anchor member

UNION ALL

SELECT E.EmployeeID, E.ManagerID, E.EmployeeName, EH.Depth + 1
FROM Employees E
INNER JOIN EmployeeHierarchy EH ON E.ManagerID = EH.EmployeeID -- Recursive member
)
SELECT EmployeeID, ManagerID, EmployeeName, Depth
FROM EmployeeHierarchy;

▶CTEs Improve Readability: CTEs are often used to break down complex queries into smaller, more manageable parts, improving code readability and maintainability. They also help avoid duplicating the same subquery logic in multiple places within a larger query.

▶Scope: CTEs are only valid within the scope of the query in which they are defined. They cannot be referenced in other queries, and they do not persist beyond the query execution.

▶ Performance: CTEs can be optimized by the SQL Server query optimizer, and they are usually as efficient as equivalent subqueries or derived tables. However, performance may vary depending on the specific query and indexing.

Common Table Expressions are a powerful tool for simplifying complex SQL queries and handling recursive data structures.

Microsoft bot Framework

Microsoft Bot Framework

The Microsoft Bot Framework is a comprehensive set of tools and services provided by Microsoft for building, deploying, and managing chatbots and conversational applications. It is designed to streamline the development of intelligent, natural language-based interactions between users and computer systems, whether in the form of chatbots, virtual assistants, or other conversational interfaces.

Key components and features of the Microsoft Bot Framework include:

  1. Bot Builder SDK: The Bot Builder SDK is a set of libraries and tools that enable developers to create conversational AI applications for various channels (e.g., web chat, Microsoft Teams, Slack, Facebook Messenger). It supports both C# and Node.js, making it versatile for developers working with different technology stacks.
  2. Azure Bot Service: Azure Bot Service is a cloud service provided by Microsoft that hosts and manages bots built using the Bot Framework. It offers a range of features, including bot deployment, scaling, and channel connectors.
  3. Bot Framework Emulator: The Bot Framework Emulator is a desktop application that allows developers to test and debug bots locally before deploying them. It simulates a conversation with the bot and provides a way to inspect and debug the bot’s responses.
  4. Language Understanding (LUIS): Microsoft’s Language Understanding service (LUIS) can be integrated with the Bot Framework to enable natural language understanding. LUIS helps bots understand and interpret user input, making it easier to build bots that can respond intelligently to user queries.
  5. Azure Cognitive Services: You can integrate various Azure Cognitive Services, such as Azure Text Analytics and Azure QnA Maker, with the Bot Framework to add natural language understanding, sentiment analysis, and knowledge base capabilities to your bots.
  6. Channels: The Bot Framework supports multiple channels, which are platforms or communication apps where your bot can interact with users. Popular channels include Microsoft Teams, Skype, Slack, Facebook Messenger, and more.
  7. Templates and Samples: Microsoft provides a range of bot templates and samples to help developers get started quickly. These templates cover various use cases and industries, making it easier to build conversational bots for different scenarios.
  8. Integration with Azure: You can leverage Microsoft Azure services for hosting, monitoring, and managing your bots, which can be highly scalable and resilient.

The Microsoft Bot Framework simplifies the process of building conversational AI applications by providing a rich set of tools, SDKs, and services, as well as integration with Azure and other AI services. It is commonly used by developers and organizations to create chatbots and virtual assistants to enhance customer support, automate tasks, and provide interactive user experiences.


Triggers in SQL Server

Triggers in SQL Server

In SQL Server, a trigger is a special type of stored procedure that is automatically executed in response to a specific event, such as an INSERT, UPDATE, or DELETE operation on a table. Triggers are used to enforce business rules, maintain data integrity, and automate certain tasks when changes are made to the data in a table. SQL Server supports two main types of triggers:

➡ DML Triggers (Data Modification Language Triggers):

➡ DML triggers are fired in response to data modification operations, such as INSERT, UPDATE, or DELETE operations on a table. There are two types of DML triggers:

➡ AFTER Trigger (FOR/AFTER INSERT, UPDATE, DELETE): These triggers are executed after the data modification operation is completed. They are often used for auditing or logging changes.

➡ INSTEAD OF Trigger (INSTEAD OF INSERT, UPDATE, DELETE): These triggers replace the original data modification operation. They are often used for handling complex data validation or data transformation.
Here’s an example of a simple AFTER INSERT trigger:

CREATE TRIGGER trgAfterInsert
ON YourTable
AFTER INSERT
AS
BEGIN
— Trigger logic here
END;

➡ DDL Triggers (Data Definition Language Triggers):

➡ DDL triggers are fired in response to data definition language operations, such as CREATE, ALTER, or DROP statements. They are used to monitor and control changes to the database schema and server-level events.

Here’s an example of a DDL trigger:

CREATE TRIGGER ddlTrigger
ON DATABASE
FOR CREATE_TABLE
AS
BEGIN
— Trigger logic here
END;

➡ Triggers can be used to perform various tasks, such as:
Enforcing referential integrity by checking and blocking invalid data modifications.

➡ Logging changes to a table for auditing purposes.

➡ Automatically updating related records in other tables.
Restricting certain data modification operations based on business rules.
Handling complex data transformation or validation before saving data to the database.

➡ It’s important to be cautious when using triggers because they can introduce complexity to the database schema and may impact performance if not used carefully. Make sure that triggers are well-documented and thoroughly tested to ensure they function correctly and efficiently in your database environment.

SQL Server profilder

Front-End Challenge Accepted: CSS 3D Cube

SQL Server Profiler is a graphical tool provided by Microsoft SQL Server for monitoring and analyzing the activity and performance of SQL Server databases. It allows database administrators, developers, and analysts to capture and view events and interactions with an SQL Server instance, such as SQL statements, stored procedures, and system events. SQL Server Profiler is a valuable tool for diagnosing performance issues, troubleshooting problems, and auditing database activity.

Here are some examples of how SQL Server Profiler can be used:

➡ Performance Tuning: SQL Server Profiler is often used to identify performance bottlenecks in database applications.
➡ Query Analysis: Profiler can help you analyze the behavior of specific queries, including the number of times they are executed, the execution plan used, and the resources consumed. This is essential for query optimization.
➡ Deadlock Detection: Profiler can capture information about deadlocks, which occur when multiple processes are waiting for resources that are held by each other. By analyzing deadlock events, you can understand the causes and take steps to prevent them.
➡ Security Auditing: You can use Profiler to track and audit database activity to ensure compliance with security and auditing requirements. For example, you can capture logins, logouts, and permission changes.
➡ Monitoring Long-Running Transactions: Profiler allows you to monitor and analyze long-running transactions. This is useful for identifying and dealing with transactions that are taking longer to complete than expected.
➡ Data Change Tracking: Profiler can capture events related to data changes, including inserts, updates, and deletes. This is useful for tracking changes to specific tables or rows.
➡ Resource Usage Analysis: Profiler can capture information about resource usage, such as CPU, memory, and I/O, which is helpful for diagnosing performance issues
➡ Troubleshooting Application Issues: When an application is experiencing issues related to database interactions, Profiler can capture the SQL statements and other events related to the problem, helping you identify the root cause.

Here’s how you typically use SQL Server Profiler:

➡ Launch Profiler: Open SQL Server Profiler from (SSMS) or as a standalone application.
➡ Create a New Trace: Start a new trace by specifying the events and data columns you want to capture. You can choose from a wide range of predefined templates or create custom traces.
➡ Analyze Data: Once data is captured, you can analyze it in real-time or save it to a trace file for offline analysis.
➡ Identify Issues: Use the collected data to identify performance issues, bottlenecks, security violations, or other problems.
➡ Optimize and Troubleshoot: Based on your analysis, you can optimize queries, address security concerns, or troubleshoot issues in your SQL Server environment.

Redis cache

Redis Cache in asp.net Core

Redis is an open-source, in-memory data structure store used as a database, cache, and message broker. It is commonly used in ASP.NET Core applications for caching data to improve performance.

To use Redis as a cache in an ASP.NET Core application, you'll need to follow these steps:

✅ Install the Redis NuGet Package:

First, install the StackExchange.Redis NuGet package, which is a popular Redis client for .NET.

dotnet add package StackExchange.Redis

✅ Configure Redis Connection:
In your Startup.cs file, configure the Redis connection in the ConfigureServices method:

services.AddStackExchangeRedisCache(options =>
{
options.Configuration = "localhost:6379"; // Replace with your Redis server and port
options.InstanceName = "SampleInstance"; // Replace with a suitable instance name
});

✅ Using Redis Cache in a Controller:

You can now use the Redis cache in your controller by injecting IDistributedCache and using it to cache and retrieve data.

public class SampleController : Controller
{
private readonly IDistributedCache _cache;

public SampleController(IDistributedCache cache)
{
_cache = cache;
}

public IActionResult Index()
{
// Set cache entry
string cacheKey = "sampleData";
string cachedData = _cache.GetString(cacheKey);

if (cachedData != null)
{
// Data found in cache, use it
return Ok($"Cached Data: {cachedData}");
}
else
{
// Data not found in cache, fetch from the source (e.g., database)
var data = GetDataFromSource();
cachedData = JsonConvert.SerializeObject(data);

// Set the data in the cache with a specific expiration time (e.g., 5 minutes)
var cacheEntryOptions = new DistributedCacheEntryOptions
{
AbsoluteExpirationRelativeToNow = TimeSpan.FromMinutes(5)
};
_cache.SetString(cacheKey, cachedData, cacheEntryOptions);

return Ok($"Data from source: {cachedData}");
}
}

private List<string> GetDataFromSource()
{
// Simulate fetching data from a database or another source
return new List<string> { "Data1", "Data2", "Data3" };
}
}

In this example, we first configure the Redis cache in the Startup.cs file using AddStackExchangeRedisCache. We then use the IDistributedCache interface to cache and retrieve data in the controller. If the data is found in the cache, it is returned; otherwise, it is fetched from the source, serialized, and stored in the cache for future requests.

✅ Make sure you have a running Redis server and adjust the connection configuration accordingly in ConfigureServices. Also, customize the caching logic based on your specific requirements and data retrieval strategies.